Guided Wizard
Introduction
Breadwinner was designed to create Sales Orders in NetSuite from any object or objects in Salesforce. This can be accomplished either automatically (through Triggers and Global Classes) or via a guided wizard. The configuration of that guided wizard is detailed below.
Restrictions
Many of our restrictions are restrictions of NetSuite. If you can’t create a record in NetSuite manually via copying and pasting, then you probably can’t use our Custom URL approach to create that same record.
Additionally, Breadwinner does not include logic that is already native to Salesforce. For instance, this tool cannot merge two Salesforce fields into one NetSuite field. However, you may create a Salesforce Formula that merges those two Salesforce fields, and use this tool to pull that single formula field into Salesforce.
Preparation
Three objects/records are required for this process:
A NetSuite object (technically, this is an object that is included in the Breadwinner managed package, though the object will start with “NetSuite…”). This object must have a lookup to the Originating Object.
An Originating Object/Record. This is the record that contains the main information you want to go on the Sales Order, such as Date, Customer, etc. (this record may optionally have a child object shown as a single related list, with many records in that related list that become the line items in NetSuite).
A NetSuite Customer record. However, most people reference a Salesforce Account instead of the NetSuite Customer, and Breadwinner will prompt the user to either select one of the existing NetSuite Customers associated with that Salesforce Account, or to create a new NetSuite Customer.
The NetSuite Object (typically either the NetSuite Estimate, Sales Order or Invoice) must have a lookup to the Originating object/record. For instance, if creating Sales Orders from Opportunities, you will need to create a lookup field from the NetSuite Sales Order object in Salesforce to the Opportunity object.
And the Originating object will need either a direct lookup to an Account (either via a lookup or master/detail) or a formula field that references a lookup to an Account. (Or you can create a formula field/lookup pointing directly to a NetSuite Customer, instead of the formula field/lookup pointing to a SF Account).
To start with, you will need to create a lookup field in Salesforce on the “NetSuite Invoice” object or the “Netsuite Sales Order” object, pointing to the Originating object. And, we strongly recommend you add the relevant related list to that object’s page layout.
Exposing the Picklist IDs
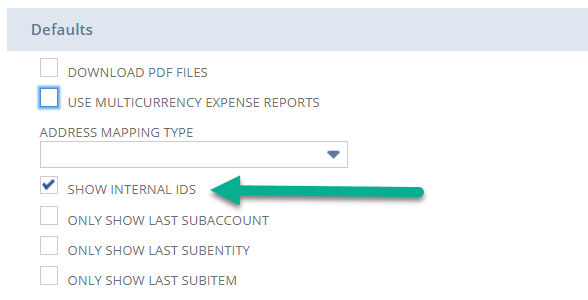
If you wish to create or modify a record with a Picklist in NetSuite, then you will need to pass Breadwinner the ID of the Picklist Option. The visibility of Picklist IDs might not be enabled in your NetSuite org. To enable visibility of Picklist IDs (which will only be visible in the Customization section of NetSuite, and not visible to end users), please go to Home > Set Preferences. On the General Tab, in the Defaults section (usually on the right) you will be able to enable “SHOW INTERNAL IDS”
Conventions in this Document
In the formulas below, the left side of the equation is our field, and the right side of the equation (after the = sign) is for you to populate based on the api names in your Salesforce org. We have also used italics for the section that should be replaced by your values. Do not use the right side values (in italics) in your formulas.
For instance, if you see
&parent_account=api_field_name__c
Then your formula would include
&parent_account=
but the api_field_name__c would be replaced by the API name of the field in your Salesforce org.
Ease of Use Tip
We have made a Custom URL Wizard to help you create these fields. To view this, simply make a button with the text below, quick-save it, add it to the originating objects Sales Order Related List page layout, and click.
This button should be created on the Sales Order object (as a Button, not an Action or Link). We recommend setting the name of the button to be something like “New NetSuite Sales Order from the [Something Object]”.
/apex/breadwinner_ns__CreateSalesOrder?testing=true
Once created, the button should be displayed on the Page Layout of the Object in question (the one you wish to create Sales Orders from), on the Sales Orders related list on that object. (in the page layout for that object, click the wrench on the related list, and then click Buttons to change the buttons on the related list). This is also the time to remove the standard New button by unchecking it, as the standard New button won’t work on Custom Objects.
URL Formula
The Custom URL Wizard will give you the formula you need. However, you may wish to further modify the URL, or just understand it further.
Also, you can create multiple buttons per object, with different formulas to be allowed Sales Orders to be populated in different ways from different fields.
When creating formulas in Salesforce, you can create a formula over many lines, separated by a new line for readability.
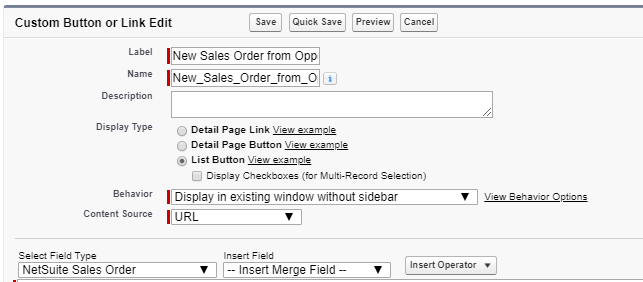
Button on Sales Order Related List
You can create a button on the Breadwinner Sales Order object itself, as a List Button (without multi- checkboxes). After creating it, you will need to display it on the related list of the originating object’s page layout.
These buttons will be added to the Page Layout of the originating object, by clicking the wrench/spanner on the Sales Orders related list.
Button or Link on Originating Object
You can also create the button, or link, on the originating object. This will be added directly to the page layout of the originating object. However, this can cause slight usability issues, which is why we recommend the button go on the Sales Orders related list.